diy essentials: making a fermenting jar

As you probably know, eating fermented veggies can be very healthy for you.
I shopped about on Amazon, and found that you can spend 50 bucks or more on fermenting jars; which are basically modified canning jars. So, in the spirit of American ingenuity, we are going to make our own using a few parts from good ole’ Amazon.
And the price is only $9.79 per jar, and if you use my hack for the fermentation weights, that brings the price down to $4.79 per jar. And do not forget that you can use them over-and-over again
So, you ready… Let’s get into the kitchen. Or, in this case the workshop.
read more
yield
serving(s)
prep time
10 Min
method
No-Cook or Other
Ingredients For diy essentials: making a fermenting jar
-
any veggies you choose
How To Make diy essentials: making a fermenting jar
-
 1WHAT YOU WILL NEED
 -
21, 2, 3
A quart-sized mason jar with a sealing disk and screw-down ring.
I picked some up at a thrift store for a buck each.
FYI: Make sure that they are large mouth canning jars. -
34.
Grommets made from food-grade silicon. I found the perfect ones on Amazon for $7.99 for ten.
www.amazon.com/gp/product/B00XKK99O0/ref=oh_aui_detailpage_o00_s00?ie=UTF8&psc=1 -
45.
Plastic airlocks to vent the fermenting veggies. I played around with a few and found these to be the best., $8.99 for a set of six.
www.amazon.com/gp/product/B0041F2DL4/ref=oh_aui_detailpage_o00_s00?ie=UTF8&psc=1 -
56.
Fermentation weights to keep your veggies under the brine. After several misses I found these for $20.00 for 4. This is the most expensive part of the kit, but I will show you a hack if you do not want to purchase them.
www.amazon.com/gp/product/B06Y3BFV3C/ref=oh_aui_detailpage_o00_s00?ie=UTF8&psc=1 -
6ADDITIONAL ITEM
A drill with a 1/28-inch bit…
Or, a friend who has a drill with a 1/2-inch bit…
Or, a pistol that takes .22 bullets, so you can shoot a whole in the lid…
Up to you.
DRILL BABY DRILL!!! -
7THE ASSEMBLEY
Drill a hole in the middle of the sealing disk.
Extra Scooby points if you get the hole spot in the middle… Ops… my bad. -
8Add the grommet to the newly-drilled hole.
-
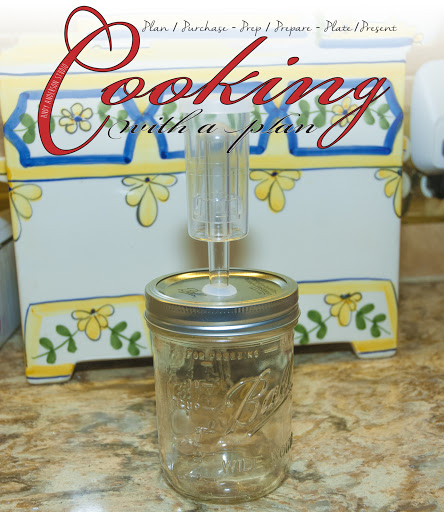
9Stick one of the airlocks into the hole with the grommet.
-
10Place your veggies and brine into the jar, and then add the fermentation weight. If you do not wish to buy the glass fermentation weights, then crumble up a piece of wax, or parchment paper, and use it to push down the veggies into the brine. If you use the paper hack you will save 5 bucks per jar. I do; however, prefer the glass weights.
-
11Screw the top back on, and wait for the veggies to ferment…
-
12Chef’s Note: It goes without saying (but I am going to say it anyway) that you can use larger jars for your formatting. The size I am creating in the photographs is what I call my “test batch” jar. It is large enough to use when I am experimenting on new fermenting ideas, and if I like it, I will move to a larger jar. Just remember, the larger the jar, the longer it takes for the fermenting process to take.
-
13Keep the faith, and keep cooking.
- Last Step: Don't forget to share! Make all your friends drool by posting a picture of your finished recipe on your favorite social network. And don't forget to tag Just A Pinch and include #justapinchrecipes so we can see it too!


Categories & Tags for DIY Essentials: Making a Fermenting Jar:
ADVERTISEMENT